Editing Remote Interviews
This page guides you through techniques for editing online Zoom interviews. We show how to edit and cover the inevitable jump cuts in interview recordings from Zoom as well as video files from any single perspective online conversation. Focusing on Zoom, this page shows how to develop interviews into a richer documentary narrative by using multiple visual perspectives as well as audio and video transitions. In addition to focusing on Zoom interviews because they provide multiple video perspectives from the same interview, we use Premiere Pro in the demonstration. Whatever video editor you are using, the concepts we demonstrate are essentially the same though they may be performed differently by your software. After reading our instructions for single interviews, think about the possibilities for combining multiple interviews into a single video!
For the demonstration, we are using an interview between Skyler Liu (Princeton ’21) and Carrie Hillebrand (’20) about what Carrie has been doing since she has been living in quarantine during the COVID-19 crisis. Skyler and Carrie are friends, having spent time together on the Princeton Women’s Swim team and in courses; they had a deep familiarity prior to this interview.
Jump Cuts
Jump cuts are video cuts that “disrupt continuity” and occur when you start and stop a recording, or when you put together different clips or moments from an interview on an editing timeline. Jump cuts refer to a very specific kind of edit that is made to continuous speech or the same action. For example, let’s say we are editing a film where an entire scene is focused on an orator who is giving a speech. When I edit the orator’s speech to cut out phrases (like “um” or “uh”) or stitch together words, these are jump cuts because they are disrupting the continuity of the orator’s speech in order to create a filmic reality for the viewer. (When I make an edit that adds a different person, location or action to the scene – this is simply called a “cut” NOT a “jump cut.” In our example, if I make an edit that moves away from the orator’s speech to another setting, this is a cut.
Jump cuts are very useful for editing around “ums” and “uhhs” and other “unnecessary” phrases, to cut out extended silences, or to bring together clips from different parts of the interview into one cohesive scene. You’ll notice in the example below that at each jump cut, the audio cuts out briefly and the visual has changed (i.e. the speaker has changed her facial expression, arm position, etc.). This can contribute to the viewer feeling “jarred” by the jump cuts, because the scene feels discontinuous and non-homogenous.
In this 30 second video, there is one initial “cut” (that moves the scene from the interviewer to the interviewee) and then three additional “jump cuts” where the editor is trying to stitch together a cohesive narrative from different parts of Carrie’s interview. See if you can spot the initial cut and the three additional “jump cuts” in this video.
Tip 1: Most people use jump cuts to stitch together different words and phrases into a cohesive sentences. Most likely, you will be trying your best to hide jump cuts once you’ve made them to bring coherence to the scene.
Tip 2: But, you can also use jump cuts to highlight contradictions in what people say. A jump cut can be so jarring that it is a sensorial performance of a juxtaposition; you can use it between sentences or at large pauses.
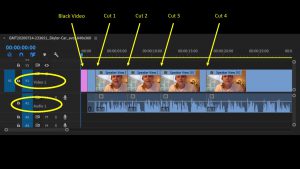
We will be using Premiere Pro as our editing software in this tutorial, but no matter what editing software you use, it will be important to understand the concept of the “timeline” in your editing workspace. Below is a labeled photo of the timeline for the video above. Notice that the V1 track (Video) is above the A1 track (Audio). The V1 and A1 files are linked, so any cuts we make in V1 are also made in A1.
Using the “Morph Cut” Effect to Smooth Over Jump Cuts
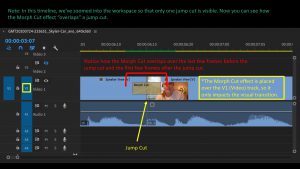
Here we used the “Morph Cut” dissolve (In Premiere: Effects > Video Transitions > Dissolve) to cover the three jump cuts you observed in the example video above. The Morph Cut helps creates continuous movement from one shot to the next so that the visual changes between each jump cut are not as stark or jarring.
Compare this video with the very first video on this page which models “Jump Cuts,” and see if you can tell a difference with the edits. Notice that after these slight edits, the video component of the film flows more seamlessly, although the audio is still choppy (Morph Cut effects only the visual transition, not the audio transition).
Tip 1: When using the Morph Cut effect, make sure you pay attention to how far the effect overlaps onto your clips before and after the jump cut. If the Morph Cut is too “long” the video may look odd, and not as “smooth” as you are hoping for it to be! If the Morph Cut is too “short,” the effect will not make a difference in the final viewing experience – the jump cut will be just as choppy as before. Typical morph cuts are between 4-8 frames.
Using Dissolves to Cover Jump Cuts or Build a Narrative
The most commonly used dissolve effects for video transitions are “Dip to Black” and/or “Dip to White.” These dissolves are visual fades: the video will fade to black/white for several frames before the cut and appear from black/white a few frames after the cut.
Dips to Black/White are dissolve effects that are most commonly used to:
- Indicate the passage of time.
- Indicate movement in space.
For example, let’s say you are making a film about a politician who uses the same stump speech throughout his campaign, and it goes something like this, “Together we can heal this country. Together we are better. Together we are America.” You can use the Dip to Black/White effect to shift between scenes of the politician saying the speech in order – but each phrase in a different time and different place. You have one clip from Minnesota where they say “Together we can heal this country” [dip to black]; then another from Wisconsin where they say “Together we are better” [dip to black]; and a final clip from Nevada where they say “Together we are America.” With these dip to black edits around the jump cuts, you created a continuous filmic reality through the audio of the speech, but you indicated the movement of time and space with dips to black.
You can also use Dips to Black/White to indicate: a shift in scene, a shift in mood, a shift in focal subjects, etc. However you choose to use this useful dissolve effect, your intention and purpose of the dips to black/white must stay consistent in all the edits used throughout the film. If you choose to use the dips to black to indicate a shift in time and space, make sure all of the dips to black in the rest of your film are also indicating a shift in time and space. It is confusing for the viewer if sometimes your dips to black indicate a shift in time and space and sometimes your dips to black indicate a shift in mood.
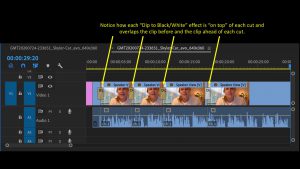
Below is one video demonstrating “Dips to Black” and one video demonstrating “Dips to White.” The dips to black/white effects are used at every one of the four cuts in this film. Notice how the dip to black/white on the first cut makes sense, because the speaker is shifting from interviewer to interviewee. But on the next three jump cuts, the dip to black feels almost as jarring as the choppy jump cuts themselves! The dip to black interrupts what seems to be one continuous sentence and one continuous time period.
Dips to black:
Dips to white:
Tip 1: “Dips to Black/White” can be a great resource while editing Zoom interviews when you want to indicate a shift in space. Zoom interviews are connecting people from across the world, so you can use dips to black/white when switching between speaker views to indicate that the people in conversation are in vastly different locations.
Tip 2: Never use “Dips to Black/White” to cover jump cuts that are in the middle of a sentence uttered in the same time and place. This is jarring; see videos above for an example. Dips to black/white work better between sentences. Instead of achieving coherence, you can use them to heighten discontinuity.
Tip 3: Be aware of how long your dip stays in black/white during the dissolve effect. If the dip to black/white goes on too long, the following clip might feel like a new chapter of the film rather than a subtle shift in time, space, or mood. If the dip to black/white is too short, it can look like a poorly edited jump cut.
Using Multiple Perspectives
Tip 1: When you record your meeting on Zoom, there is an option to download the recordings of both the Speaker View and Gallery View. This is incredibly useful – make sure you understand this workflow before recording your interview!
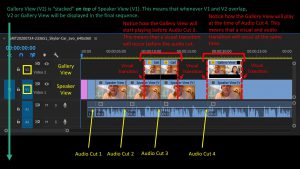
In this example, you place both Zoom recordings from both the Speaker View and Gallery View onto separate Video tracks (V1 and V2). The interviewer’s presence enters the narrative of the video once we include the Gallery View. By creating edits that switches between the two views, your viewer recognizes that the video portrays larger conversation between two people (even if the interviewee is doing most of the talking).
Switching between Speaker View and Gallery View also helps to keep the video visually engaging, as it allows the viewer to witness the reactions of the interviewer and their interlocutor, who ever is not speaking, but is listening. You have a lot a storytelling choices here, but be careful not to switch views too often, as it can become distracting.
Let’s take a look at the timeline to understand how we are switching between Speaker View and the Gallery View on Zoom in the editing software.
Now, let’s look at the edited film to understand how adding multiple perspectives helps to to 1) extend the narrative, 2) make the video more engaging, and 3) cover jump cuts.
Tip 2: You can switch the video from Speaker View to Gallery View before the audio jump cut. This helps to soften the “choppiness” of the jump cut – the audio “pops” at the jump cut are less noticeable. (There are more sophisticated ways of covering the visual and audio roughness of jump cuts – you can do finer frame-by-frame edits, you can fade the audio sound before and after the jump cut, etc.) (See Audio Cut 3 in the above example)
Tip 3: You can switch the video from Speaker View to Gallery View at the time of the jump cut, meaning that a visual transition and an audio jump cut will occur at the same time. This can work well if the visual transition of the jump cut was very choppy and it feels impossible to stitch the frames together in a way that feels cohesive or continuous. Rather than spending time trying to craft a smooth transition over a jump cut, you can switch to a completely different video (in our example, the Gallery View) at the time of the audio jump cut. (See Audio Cut 4 in the above example)
Putting it All Together: Jump Cuts, Visual and Audio Transitions, Multiple Perspectives
In the following example, we put everything we have presented so far to use.
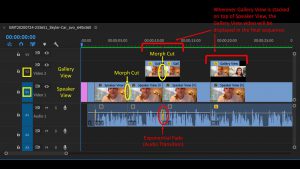
- We made one initial cut to move from the interviewer (Skyler) to the interviewee (Carrie). Then we made three jump cuts within Carrie’s speech to attempt to create one cohesive and continuous sentence.
- Wherever necessary, we used the Morph Cut effect to smooth over the visual transition of the jump cuts.
- We also added the Gallery View to create a more visually engaging video. The switches from Speaker View to Gallery View help cover jump cuts, show reaction shots of the interviewer, and signal that this is a conversation between two people.
Note: We also included a more advanced audio transition effect called “Exponential Fade” (Effects > Audio Transitions > Crossfade). The “Exponential Fade” audio transition overlaps sound between the two clips that are separated by a jump cut. Other kinds of fades may similarly help to smooth the audio cut.
Take a look at the timeline below to understand how all of these simple edits come together in the final sequence. Then watch the video below to see if you can tell where the edits have been made.
Finally, below is a screen recording of the Premiere Pro editing interface as it plays back the final sequence. On the bottom right of the screen is the timeline (or workspace where we make cuts, dissolves, and other edits). On the top right of the screen is the display monitor which plays the final edited sequence. On the bottom left of the screen is the media library, which includes a full recording of the interview in Gallery View, a full recording of the interview in Speaker View, and a full audio recording of the interview.
More on Editing Dialogue
In the Dialogue section on the recording Zoom interviews page, we learned that timing questions (leaving large pauses before and after questions, leaving large pauses before and after answers) is incredibly important for the editing process. Let’s explore what editing conversations/interviews can look like using the following example videos.
We need to intentionally remind our interlocutor/interviewee that they need to leave a pause after the end of the question, before they start responding. While they may forget to do so, because it’s not typical practice, you should at least remind yourself not to interrupt them as they are speaking and to leave a pause after they stop talking before you speak or ask the next question.
This is what your recording might look like if you and your interlocutor leave deliberate pauses during the interview.
If we don’t leave short pauses between each question and answer, the editing process becomes very difficult and we run the risk of “talking over” one another. This is important because the continuous overlapping speech makes it difficult to find “cut points” in between yours and their utterances. Here’s an example of what might happen if you don’t intentionally remember to leave pauses.
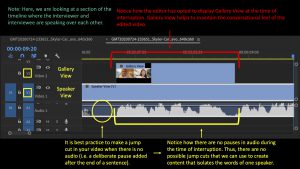
If you leave pauses after sentences, the editing process will be much easier, and you can edit your final film to look and feel more like a conversation.
As an example, take a look at the film below, which is an edited version of the interview between Skyler and Carrie. The film uses all of the editing techniques we’ve discussed in this tutorial (jump cuts, using multiple perspectives, using visual/audio transitions, etc.) which you can see in the screen recording of Premiere Pro as it displays the final sequence.
View the edits in the Premiere Pro interface: