WordPress is an easy-to-use website creation platform with features that make it particularly beneficial to active, constructive course assignments. Primarily a blogging tool, articles are published as date-stamped ‘posts’ that can be tagged and categorized, encouraging a wide range of ways to present and organize information. WordPress sites on the McGraw Commons platform can be restricted to participants of a particular course, individual netIDs, or made open and available to the world.
Quickstart Guides
Quickstart Guide to WordPress for Instructors
A brief introduction to the back-end interface including some features usually only available to instructors.
Quickstart Guide to WordPress for Authors
A brief introduction to the back-end interface intended for student authors.
Your Writing Environment
WordPress posts and pages are composed in a back-end interface called the Dashboard. Within this Dashboard, you will find links in the left-hand menu for adding posts and pages. The interface for adding posts and pages are almost identical. Both allow you to enter a title and offer a large text area for entering the body of the page or post.
In the right-hand sidebar of the editing screens are options for publishing your page or post, setting the date of publication, adding tags and categories, and associating a decorative, ‘featured image’ for display with the post.
Visual vs. Text
You will notice that the text entry box you type your page or post into has two tabs at the upper right. “Visual” is a WYSIWYG editor, that allows you to see most text formatting, images, links, bullets and other features, almost as they will appear in your published page or post.
“Text” mode shows you the underlying HTML code that constitutes the page.

In Visual mode, the toolbar that appears at the top of the text box should be familiar from other word processing programs. (If you don’t see two rows of buttons, expand the toolbar using the icon furthest to the right).
Note: while the WYSIWYG editor attempts to display your composition as it will appear on the frontend of the blog, the final appearance is affected by many things such as the selected theme and web browser used to view the page. There will always be limits to how precise you can be about how your page is displayed.
Adding media to your post or page
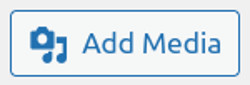
Place your cursor in your post (or page) at the place at which you would like to embed your media. Click the Add Media button found just above the editor to select an existing media item or to upload a new one.
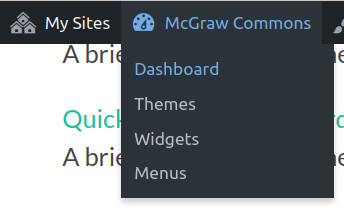
Selecting a Theme
McGraw Commons contains many different themes / designs to choose form. Changing the theme does not alter the content of your pages or posts at all, but each theme will differ in terms of menu locations, header and footer options, and layout.
- In the Dashboard, select Appearance ->Themes from the left-hand menu.
- Click the Activate button to make any theme active.
If you do not see these options, contact the McGraw Center at mcgrawect@ to elevate your permissions.
Changing Your Theme’s Banner Image
Most WordPress themes feature a decorative header (or banner) image across the top of the page that exists on all pages of the blog. If the theme you have selected features a header image, you can easily change the image:
- Enter the Dashboard of your website.
- Select Appearance from the left-hand menu and then click Themes.
- Click the Customize button under the first, currently active theme.
- In the Customize menu, select Header Image and follow the instructions.
Adding images, audio, video and other media
Media can be uploaded and added to blog posts and pages:
- Open the Edit screen for a post or page.
- Place your cursor at the location in the body text editor where you would like to insert the media item.
- Click the Add Media button found just above the text editor.
- Follow the instructions to either upload or insert an existing media item.
Note: media files, including images and audio, but especially video files, are often much larger than they need to be. Compressing the size of your media files before uploading them to your website will drastically improve the experience for those that visit your website. Contact the Digital Learning Lab to find out about software and techniques for media compression.
Adding images, audio, video and other media by URL
Media can also be added to your website, if it is available at a publicly available web address (URL), without uploading.
- Place your cursor in the editor at the point at which you would like to insert the image, audio, video or other media file .
- Click the Add Media button and select Insert from URL from the left-hand menu in the Media window.
- Audio files can also be added to your page or post using a WordPress shortcode:
 audioplayer file="the_url_to_the_audio_file.mp3"]
or
embed width="123" height="456"]the_url_of_the_video_file[/embed]
WordPress also features an open format called oEmbed that can distinguish some media URLs, such as those from YouTube or Vimeo, and automatically convert them into embedded media players when you save your post or page. Simply insert the web address (URL) of the video as a new line in your post. If the video comes from one of the platforms recognized by oEmbed, a video player will be automatically embedded into your page or post.
Make sure to attribute proper credit to images not owned by you. This is good practice, even if your website is password protected. Copyright-free images or images with an attribution-type license are also available on sites such as MorgueFile, Pixabay, Unsplash, Pexels, the Library of Congress and Flickr. Pay attention to the type of CC license the author has placed on each image.
Creating image galleries
Images added to a McGraw Commons blog can be organized and presented in a tiled image gallery or as an in-page slideshow.
- Place your cursor at the location at which you would like to insert a gallery.
- Click the Add Media button to open the Media Library.
- In the left-hand menu, select Create Gallery and then select the images you would like to include in your gallery.
Footnotes: cite references and sources in your page or post.
The ability to add footnotes is enabled on all McGraw Commons sites. To add footnotes to a page or post
- In the text editor and in the line of text, enter square brackets containing a number and the footnotes you would like to insert, such as:
1
Try to keep the numbers sequential as you enter footnotes, but if you skip a number or move a footnote, it doesn’t matter. The plugin will re-number them in the order they appear. - When your post or page is saved, the footnotes will appear as sequential footnotes in the public, published view.
- Note that copying and pasting from a word processor using what looks like this code will often cause errors and not create a footnote correctly. If you must copy footnotes from Word into WordPress, try pasting them into a plain text editor such as TextEdit or Notepad first and then copying pasting into WP.
If you insert page breaks into your page or post, the footnotes will appear at the bottom of any page section containing a citation.
Enabling or disabling comments
Commenting can be enabled on any post or page. Comments can appear as a list or threaded to enable multiple threads of discussion but always appear at the bottom of a post or page when available. Comments can appear on the page as soon as they are submitted by your visitor, or can be held for moderation by a site administrator.
- In the Dashboard, open the Settings menu on the left-hand side and select Discussion.
Note: the McGraw Center reserves the right to disable comments at any time on sites that are publicly available.
- This is the text of my footnote ↩
