Disassembling
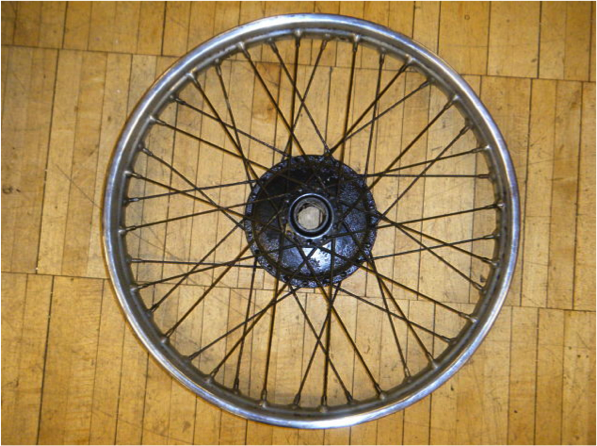
We began with two wheels that were extremely worn out and had rusted spokes. We wanted to use the hub from the wheels though so we had to de-spoke the entire thing in order to get the hub out. We bought entirely new spokes and rims.
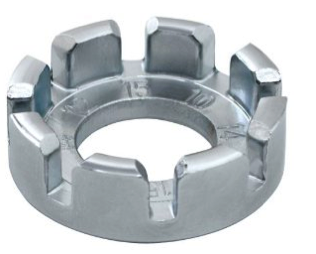
One problem we had with de-spoking and re-spoking was that the spoke wrenches that we have aren’t the right size for the nipples on the spokes for this bike. That made tightening and loosening everything a little bit challenging.
Reassembling

Before we started lacing the spokes on the hub we had to assemble the rest of the wheel. First we greased the axle and packed the ball bearings with grease in order to ensure smooth motion so that the wheels would turn properly. It was important to have clean, uncontaminated grease without any grit that might get stuck in the ball bearing or on the axle. Then we had to carefully assemble the parts, except the brakes, in the hub.
A problem that we had was that when we put the ball bearing in on the rear wheel we accidentally did not have it lined up perfectly. It was slightly tilted, so that when we tried to put the wheel on the bike and spin it, it would get stuck. We had to hammer the ball bearing out and set it carefully back in.
Lacing the Wheel
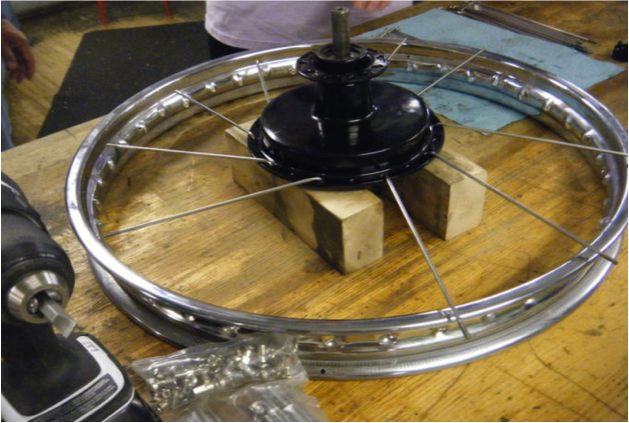
The first step in lacing the wheel is making sure that all of the spokes are attached to the hub and the rim in the right places. There are two sizes of spokes: one size attaches to one side of the hub and the other attaches to the other. On each side the spokes go in two different directions (cross each other). This means that there are four orientations of spokes. We did one orientation at a time to put the spokes in every fourth hole on the rim. When we first put the spokes in we only tightened them enough so that they wouldn’t fall out. Putting the spokes in the right holes is challenging just because they all look the same. We had to take them out and put them back in a few times before we got it right.
Tightening the Spokes

The next step was tightening the spokes. We tightened each spoke until there was a fair amount of resistance. We did this by tightening each spoke one or two turns at a time. It is important to not tighten a spoke all at once because of how dependent each spoke is on the other ones. If you tighten one side it tightens the other side automatically, and also moves the hub so that the wheel is off center; therefore, it is important to tighten each spoke a little bit at a time to maintain the centrality of the hub. This makes truing easier.
Truing and Tuning

Once the spokes were tightened almost all the way, we had to start truing the wheel. Even though the spokes have all been tightened the same amount, theoretically, there can still be a good amount of wobbling which comes from the rim and the hub not being perfectly aligned. The hub and rim might not be parallel with one another or the hub might not be perfectly centered in the wheel.
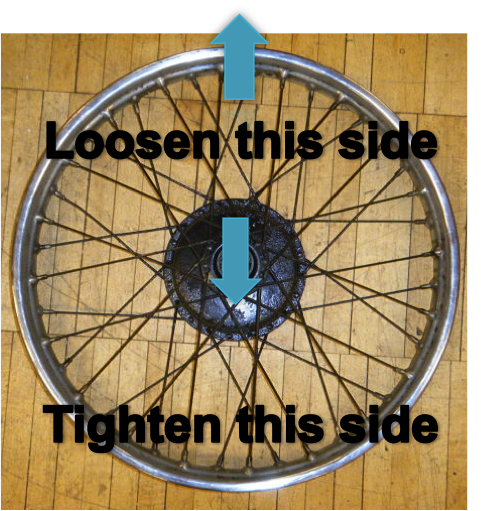
Side to Side motion: The first of these two problems with alignment involves side to side motion. If the rim is too far to the right over a certain area (it wobbles), then you want to loosen the spokes on the right over that area and tighten the spokes on the left. This will pull the hub farther to the right consequently moving the rim to the left. (See diagram)
Concentricity: The second problem of alignment deals with concentricity. This means that the hub is not completely centered so the wheel rotates in concentric circles rather than in one circle. This diagram shows a wheel that rotates too low on the bottom part. If you tighten the bottom spokes and loosen the top spokes the hub will move down and the rim will move up.
The important part of truing the wheel is making sure you alternate between both types of problems. Just because it is perfect side to side does not mean it is perfect concentricically. In order to get it within the 1/32 (ideally less) of an inch boundary you have to do both many times.
The final step in the process is tuning the wheel. This just means going through each spoke and hitting it with something and making sure it sounds clear. If there is any vibration in the tone of the spoke it means that the spoke isn’t tight enough. Ideally the spokes of the same type would vibrate at the same pitch but concentricity and side to side motion are far more important. Really tuning is mostly to make sure that they are tight enough.
Wheel Offset
One thing to remember when tightening the spokes on the rear wheel is the wheel offset. Because the chain attaches to the sprocket on the rear wheel it is important that the hub is just the right distance from the rim or else it won’t fit when you try to put the bike together. We created a tool to measure this offset before we tightened the wheels.
Putting it all together

Torque
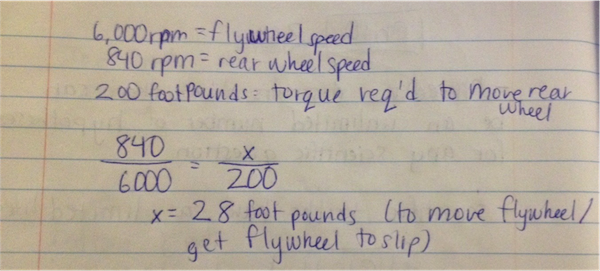
Torque is the twisting force supplied by the engine that gets split up between the wheels. Large amounts of torque can cause wheel slippage. Because there are multiple plates in the clutch there are multiple torque thresholds for slippage. In class we calculated the amount of torque required for a wheel to slip (keep in mind this is for the fly wheel, the gears themselves have different torques based on this). From the results we see that the torque is 28 foot pounds.
Forces Acting on a Wheel

There are four basic forces that act on a wheel. Compression is a force that acts on the spokes on the bottom of the wheel at any given time. Tension is a force that acts on the spokes on the top of the wheel at any given time. Shearing is a force that can warp the wheel. It can lead to bending forces. Bending forces can be especially bad. They cause spoke fatigue which can eventually lead to breakage. An example of this is bending a paper clip. If you bend it a certain number of times it will eventually break.
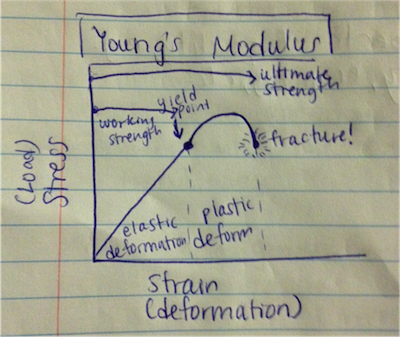
Young’s Modulus of Elasticity shows us how much bending force is needed before something breaks. There is a certain amount of force required until something is permanently warped. After that there is a certain amount of force required for something to completely break.
Gravity pulls the hub down which compresses the bottom spokes and pulls the top spokes into tension.
Impact forces are when the motorcycle collides with an outside force like a speed bump. This can also cause a shearing force on the wheel.
Acceleration forces act on the hub in a clockwise direction and act on the tire in a counter clockwise direction. They allows the wheels to spin, and consequently, the motorcycle to move.
Deceleration forces include the force on the wheel from the breaks. This works through friction occurring from the motorcycle tire’s interactions with the ground.